Using a Built in Light Meter
For this vocabulary exercise you will be breaking into groups of 5. Each student will be selecting on of the following terms to create a Verbal Visual Word Association(VVWA).
To create a VVWA you will take a piece of paper, fold it in half horizontally, then in half vertically. While it it still folded dog ear the inside center corner. When you unfold this should create a diamond in the center with four other quadrants. You will need to fill out the following information for your vocabulary term.
Once you have completed your card share out with your group so that you all have a good understanding of all of the words. These vocabulary words are really the building blocks for the rest of the term.
- Reflective light meter
- Incident light meter
- Middle gray
- Contrast
- Averaging meter
To create a VVWA you will take a piece of paper, fold it in half horizontally, then in half vertically. While it it still folded dog ear the inside center corner. When you unfold this should create a diamond in the center with four other quadrants. You will need to fill out the following information for your vocabulary term.
- Center Diamond - The Word
- Top Left - Definition of the Word
- Top Right - Image that reminds you of the definition
- Bottom Left - Analogy/ personal association
- Bottom Right - How it is used in photography
Once you have completed your card share out with your group so that you all have a good understanding of all of the words. These vocabulary words are really the building blocks for the rest of the term.
2. Exploring the Built-in Light Meter - Classwork
Answer the following question from the hand out or from the scanned text below.
1. What is the difference between an incident light meter and a reflective light meter? Which is used in the DSLR camera?
2. Describe how a center weighted meter works.
3. In a reflected light meter, what is the tonal value the meter “see” and recommends as the exposure?
4. What are three lighting situations that can cause the cameras light meter to not work properly?
5. What are the steps to over come the misleading reading?
6. Explain in your own words how to make a white object white when using an averaging meter?
7. Explain in your own words how to make a black object black when using an averaging meter?

In the Camera
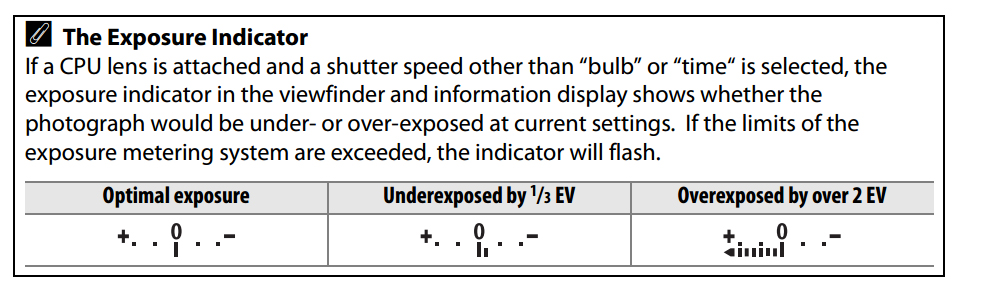
As you start to shoot your assignment, pay close attention to the actual light reading of the camera as indicated by the "Exposure Indicator". It can be found on the back of the camera or at the bottom of the view finder in side the eyepiece. In most cases we want the exposure indicator to line up with the zero before shooting. Only in extreme lighting situation might you want to over ride this exposure and give the camera more or less exposure than what is indicated.
3. Using the Built-in Light Meter Shooting Assignment
The idea of this project is to help you familiarize yourself with the DSLR camera’s built-in light meter. You and a partner will be sharing a camera. You will each be shooting in six different situations. For each situation you will need to use the built-in light meter to determine the correct exposure. One person should shoot all six situations then switch off for your partner to take their photos. Each person is responsible for his or her own images and exposures. When determining the correct exposure start by setting the setting the shutter speed to 1/100, then use the f-stops to get the correct exposure. If you run out of f-stops and still do not have the correct exposure, then start to adjust the shutter speed. While shooting remember to be creative, try different angles, move in close and have fun.
Record you exposures for each of the following situations:
F-Stop Shutter Speed
1. Full Sun ________________ _________________
2. Shade ________________ _________________
3. Inside ________________ _________________
4. White on white ________________ _________________
4a. +2 stops ________________ _________________
5. Black on black ________________ _________________
5a. - 2 stops ________________ _________________
6. Much brighter Background ________________ _________________
6a. (Move in close) ________________ _________________
