Portrait Lighting ---- Working with the Directions of Light
For this vocabulary exercise you will be breaking into groups of 5. Each student will be selecting on of the following terms to create a Verbal Visual Word Association(VVWA).
To create a VVWA you will take a piece of paper, fold it in half horizontally, then in half vertically. While it it still folded dog ear the inside center corner. When you unfold this should create a diamond in the center with four other quadrants. You will need to fill out the following information for your vocabulary term.
Once you have completed your card share out with your group so that you all have a good understanding of all of the words. These vocabulary words are really the building blocks for the rest of the term.
- Hard Light
- Butterfly Light
- Rembrandt Light
- Short Light
- Broad Light
To create a VVWA you will take a piece of paper, fold it in half horizontally, then in half vertically. While it it still folded dog ear the inside center corner. When you unfold this should create a diamond in the center with four other quadrants. You will need to fill out the following information for your vocabulary term.
- Center Diamond - The Word
- Top Left - Definition of the Word
- Top Right - Image that reminds you of the definition
- Bottom Left - Analogy/ personal association
- Bottom Right - How it is used in photography
Once you have completed your card share out with your group so that you all have a good understanding of all of the words. These vocabulary words are really the building blocks for the rest of the term.
Lighting Patterns Inspiration Gallery
Watch your favorite binge worthy show, pay close attention to the lighting, identify each of the following lighting patterns: Butterfly, Loop, Rembrandt, Side, Rim and Back light. pause the show and take a screen shot .Bring the image into Photoshop and draw the lighting pattern on the portrait. Also draw a lighting diagram the shows the position of the sun relative to the subject. Post both the original image with the web link and your annotated image after.
Watch this video about how to bracket the exposure: https://www.youtube.com/watch?v=Gx1YjOXeDSU
Hard Light Portraits in Full Sun
For this shooting assignment you will be working in group of two. Each person in the group will have a chance to preform both of the jobs: Photographer and Model. In this shoot you will be experimenting with:
Bracketing
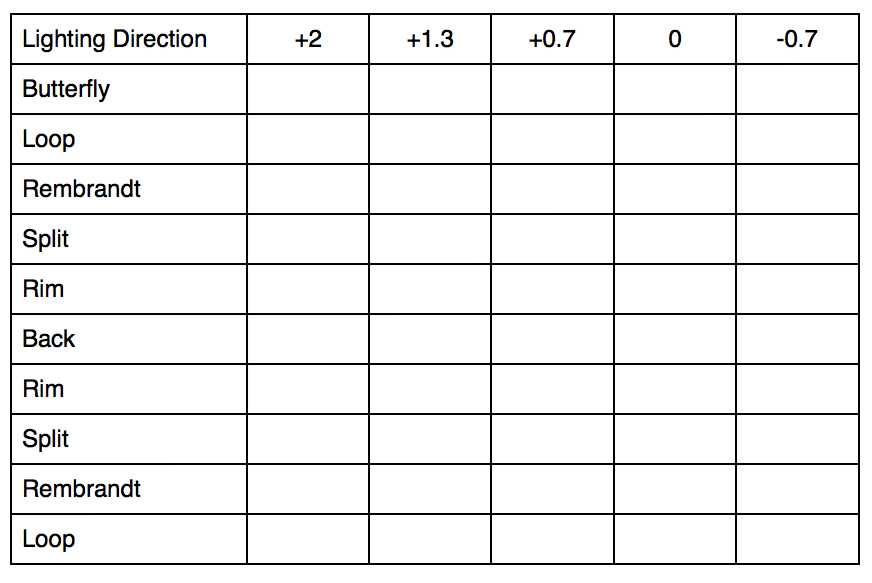
For this assignment several of the Lighting conditions may cause the light meter to be fooled. To make sure that you get a good exposure for each of your lighting directions we are going to use a technique called bracketing. Basically bracketing means that you will be shooting not only at the normal exposure, but at set interval above and below the normal exposure. For each direction of light use the light meter to expose: +2, +1.3, +0.7, 0, -0.7. This will give you about a 3 stop range of exposure. Set up the camera in the following way to make your shoot easier.
At the top of your page, you will be creating a slide show with the best exposure for each directions. Label the direction of light and identify the exposure compensation used for the best image.There will be 10 all together. Also, below post separate galleries of each of the directions. Label the direction and the exposure compensation of each shot.
Hard Light Portraits in Full Sun
For this shooting assignment you will be working in group of two. Each person in the group will have a chance to preform both of the jobs: Photographer and Model. In this shoot you will be experimenting with:
- The direction of light to create the different lighting patterns.
- Using short and broad lighting.
- Testing bracket exposure to get the best exposure.
Bracketing
For this assignment several of the Lighting conditions may cause the light meter to be fooled. To make sure that you get a good exposure for each of your lighting directions we are going to use a technique called bracketing. Basically bracketing means that you will be shooting not only at the normal exposure, but at set interval above and below the normal exposure. For each direction of light use the light meter to expose: +2, +1.3, +0.7, 0, -0.7. This will give you about a 3 stop range of exposure. Set up the camera in the following way to make your shoot easier.
- Set the camera mode to (A) Aperture priority
- Make sure that the camera is set to ISO 100 and JPG Fine
- Set the the F-stop to 5.6
- Set the focal length of the lens to 100mm
- Use the +/_ exposure compensation button to adjust the exposure to the earlier specified numbers
- set the lens to(AF) Auto Focus
At the top of your page, you will be creating a slide show with the best exposure for each directions. Label the direction of light and identify the exposure compensation used for the best image.There will be 10 all together. Also, below post separate galleries of each of the directions. Label the direction and the exposure compensation of each shot.
Watch the video of how direct your model for the directions of light https://www.youtube.com/watch?v=WKBhBO00TMM
Use the following chart when shooting in Full Sun.