Portrait Lighting ---- Rembrandt light with Modification

Rembrandt Portraits with Light Modification
For this shooting assignment you will be working in group of three. Each person in the group will have a chance to preform all three of the jobs: Photographer, Assistant, and Model. In this shoot you will be experimenting with:
Bracketing
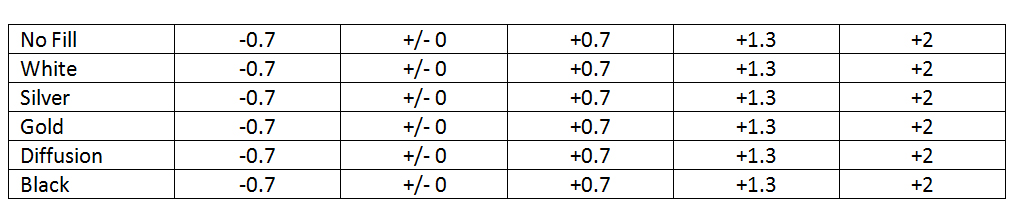
For this assignment several of the Lighting conditions may cause the light meter to be fooled. To make sure that you get a good exposure for each of your lighting directions we are going to use a technique called bracketing. Basically bracketing means that you will be shooting not only at the normal exposure, but at set interval above and below the normal exposure. For each direction of light use the light meter to expose: +2, +1.3, +0.7, 0, -0.7. This will give you about a 3 stop range of exposure. Set up the camera in the following way to make your shoot easier.
For this shooting assignment you will be working in group of three. Each person in the group will have a chance to preform all three of the jobs: Photographer, Assistant, and Model. In this shoot you will be experimenting with:
- The direction of light to create the different lighting techniques
- Learning how to work with reflectors to modify the shadow of the portrait
- Diffusing the hard light to create a soft light portrait
Bracketing
For this assignment several of the Lighting conditions may cause the light meter to be fooled. To make sure that you get a good exposure for each of your lighting directions we are going to use a technique called bracketing. Basically bracketing means that you will be shooting not only at the normal exposure, but at set interval above and below the normal exposure. For each direction of light use the light meter to expose: +2, +1.3, +0.7, 0, -0.7. This will give you about a 3 stop range of exposure. Set up the camera in the following way to make your shoot easier.
- Set the camera mode to (A) Aperture priority
- Make sure that the camera is set to ISO 100 and JPG Fine
- Set the the F-stop to 5.6
- Set the focal length of the lens to 55mm
- Use the +/_ exposure compensation button to adjust the exposure to the earlier specified numbers
- set the lens to(AF) Auto Focus
At the top of your page, you will be creating a slide show with the best exposure for each modification. Label the direction of light and identify the exposure compensation used for the best image.There will be 6 all together. Also, below post separate slide shows of each of the modifications. Label the direction and the exposure compensation of each shot.
Inspiration Gallery
Pick your favorite celebrity, then do a google images search. Select 10 image that use the Rembrandt technique. Make sure to include links to the original sites.
